Easy Tray Project


This is a really simple tray project that I did over the weekend. You can pick up the supplies at a local craft store for around $20 or less. It only takes about 2 ½ hours, and most of that is dry time. Instructions and pictures below. Enjoy!

Supplies:

  • Tray (in the unfinished wood section of your local craft store)
  • Stencil of your choice (I chose a cherry blossom)
  • Spray paint of your choice (I chose an Espresso – Satin Finish)
  • Acrylic Paint of your Choice (I chose Leaf Green)
  • Clear Acrylic Coating
  • Paint Brush (I prefer a foam brush or roller)

Spray paint the tray using the instructions on the can. I did two coats, with about 45 minutes in between each coat.

Once tray has fully dried, place stencil in desired location and secure with tape for a clean line. Then carefully brush on the acrylic paint. I did two coats, letting dry 15 minutes in between. Once fully dry, remove stencil. If your lines are not smooth because the paint leaked, do not worry. It happens. When it happens to me I will take a very small paint brush, dab it in some of the spray paint, and try to make it a little neater around the edges.

In about in an hour/hour and a half (once the stencil is completely dry), spray with a coat or two of the acrylic spray and there you have it!

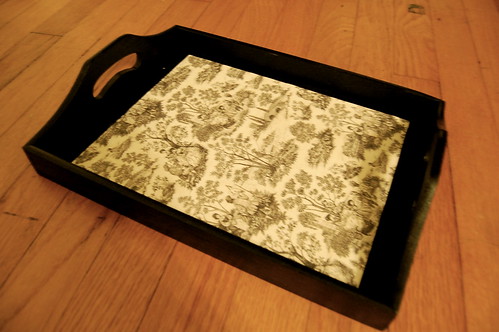
The great thing is that you can customize it to whatever color/style you want. For a different look you can also use craft paper on the tray (just use a good adhesive – I like mod podge). Here is an example of one I made. If you decide to make your own tray be sure to share the pictures!

Smooth Move.

I picked up Dove’s ‘Damage Therapy’ shampoo and conditioner a few days ago, and am in love. My hair smelled amazing and felt really soft & smooth all day. I sort of picked it up on a whim, just wanted to try something new. But now I am hooked, which I am completely ok with because it is wonderfully affordable.

I’m Planning on doing some crafts this weekend, and will certainly be sharing them with you soon. I hope you (whoever you are) have a great weekend.

Homemade Pita Chips & Hummus

I love pita and hummus – and was eager to try making my own. One of my favorite kinds of hummus is Greek Calamata, and it was even better homemade (recipe below). I served it with some simple homemade pita chips and baby carrots, and it was delicious.

I love the idea of making your own hummus, because you can really experiment with different flavors and try new things. I can’t wait to try a southwestern blend and a sun dried tomato blend.

I think it is best to customize it yourself so that it turns out exactly how you want it. But below is a simple outline of how I made mine.

Hummus Ingredients

  • 1 can (15 oz.) garbanzo beans (mostly drained, with some reserved liquid)
  • 2 tablespoons Tahini
  • 2 tablespoons lemon juice
  • 2 tablespoons extra virgin olive oil
  • 1 clove garlic (minced)
  • ½ cup pitted calamata olives
  • 1 teaspoon Salt and Black Pepper to taste

Pita Wedges

  • Pita bread, cut into triangles
  • Olive Oil Cooking Spray
  • Garlic Salt and Ground Pepper to taste

Directions: Preheat oven to 400F. Spread pita triangles on a baking sheet and spray with cooking spray, top with garlic salt and black pepper, and toast in oven 6-8 minutes. Combine all of the Hummus ingredients in a food processor and blend until it reaches your desired consistency. Voila!

Casual Friday

imageimage

          {Scarf: Old Navy, Jacket: Ross (Boom!), White Tank: H&M, Jeans: Express, Sandals: Urban Outfitters.}  

This past week has been very busy and exhausting. Needless to say, I was very excited for it to be Friday. Friday’s are casual day at work so I was able to wear something laid back – which fit my mood perfectly.

This weekend I plan to catch up on some sleep and maybe even start my Christmas shopping. I could not be more excited for the holidays! I’m ready for Christmas trees, music, and decorations (not to mention the good food and good times that will be had!).